I get several emails when I post pictures like this one asking, "How do you stitch this way??". So I thought I would do a picture tutorial of how my mind works. I hope this helps a little. The design I chose to show you is my Mystic Stitch - Augusta the 13th hole. As you can tell I like to stitch in a stair step process because it is easier for me to keep up with 10 x 10 grids. Please feel free to email me if you have any questions.
As you may know, I am a math teacher so when I look at a cross stitch chart, I see a coordinate grid. I see 10 x 10 grids and that is how we start.
1. Start in the upper left hand corner 10 x 10 grid. The first symbol here is a square which is DMC 310.
As you can see I am picking up in the upper left hand corner where there is already a thread hanging from a previous stitching round. I use that thread and stitch every square symbol in the 10 x 10 grid.

2. Carry that thread into the 10 x 10 grid below the one you just filled in, bring the thread up into the bottom left hole and drop the thread....as you can see in the picture below, I have a black thread started in the next grid.
3. find the next symbol and start the process over again. If you see below my next symbol is an *. This is color 3371 and I will stitch all the * in my current grid. If you look at the picture above, you will see that I have a brown thread waiting for me to pick up and use to stitch.
As you can see below, I have filled in all the * symbols and now have to move on to the next symbol. Which is a ). I have a thread already there and will just fill it in.
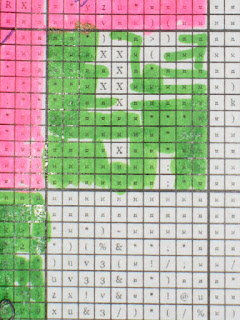
If you need to see the grid for the ), here it is......

The process is continuing. If you notice below, I have several threads in the bottom 10 x 10 grid, this is because I was at the bottom of the page and I carried over from the left 10 x 10 grid to the grid on the right beside it. I hate wasting thread so that is why there is extra threads.
Filled in 98% of my 10 x 10 grid...just have 2 more squares to go!!!
Here is the filled in chart in case you want to see it.
All filled in!!!! I have stitched my 10 x 10 grid and can move on to the next one!!!!!!
I truly hope this helps some of you with understanding on how I stitch my BAP's. You now have a small glimpse into my stitching mind!!!!


6 comments:
Wow, looks much faster than the way I was trying! I'll definitely give it a whirl the next time my parking project pops up in my rotation :D Thanks for the tutorial!
So interesting how differently people`s brains work - I hardly see the lines of the grid, I only see shapes made up by individual colours. I loved your tutorial, it`s always fascinating to see a picture grow by 10x10 squares at a time, although I don`t think I could use the parking method as I hold my fabric. How do you avoid tangling all the threads? Love the foliage on that tree, btw, it looks stunning!
Thank you for sharing..so interesting..
Big hugs x
AHA! I think I FINALLY understand what "parking" is - and I really want to thank you for showing such detailed steps in the process! I have several HAED charts I've purchased and would really like to start stitching, but the last time I tried, I gave up too soon. Everyone told me to grid my fabric, but that wasn't really as helpful as this technique is.
Do you ever get "lost" or forget which symbol goes with a certain color, or are you pretty much set because you've already placed the thread in the next spot where that symbol occurs? I think that's been my biggest fear - but now that I see it broken down into the 10 x 10 blocks, it looks perfectly "doable" to me! Thanks!
Thank you for the info and picks Vickie. It does make sense and you make it look and sound easy. But, some colors look so much alike, how do you know you have chose the right one.
Linda
Seems simple when you say it but I tried it and decided it was not for me.
Post a Comment